For our Bottleneck 2012 competition, we decided that we should all build a speaker built around a full range driver. After some discussion we decided that the full range driver could be augmented at the high or low frequencies by a tweeter or woofer. The total cost, including crossover parts if used, would need to be less than $200. Cost of the enclosures was not to be included. The speaker should not just be a copy of an existing design.
I considered doing something along the lines of the Martin King H frame high qts woofer for the low end and some sort of full range speaker for the mid range and highs. However, it gets difficult to stay under $200 because of the cost of the cross over parts, particularly the inductors. I would thoroughly recommend going to the above link and reading about his various projects, particularly the open baffle H frame projects. If you find the open baffle speakers interesting, you could also read about the Manzanita which is similar but different to the Martin King concepts.
After some thought, I remembered an idea I had wondered about years ago to build back to back horns. There would be no compression chamber as usually found in a horn, but in effect it would be an open baffle H frame but in a horn shape. I downloaded the Mathcad software that Martin uses to model his H frames but the package does not want to load on my small netbook for some reason or other. Still, I decided to proceed to see what happened.

Here is the finished product in all its glory. Essentially a front cone, a back cone and the full range driver mounted on a sheet of 1/2 inch plywood that I had lying around from a failed project.
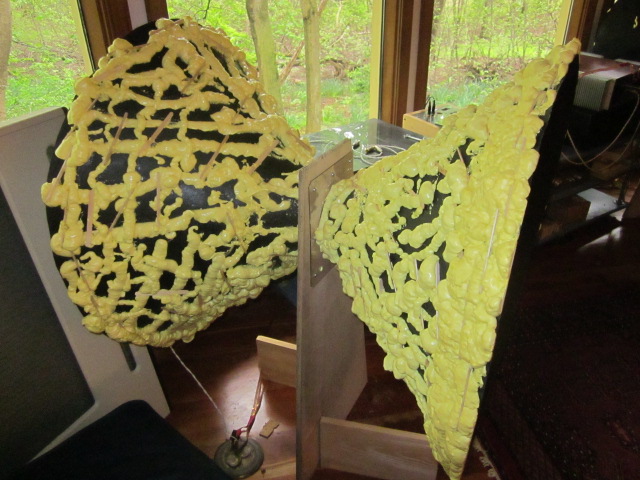
Here is the finished product in all its glory. Essentially a front cone, a back cone and the full range driver mounted on a sheet of 1/2 inch plywood that I had lying around from a failed project.

Each horn is roughly 32 inches in diameter and 16 inches deep.

The driver recessed into the plywood. It's a Mark Audio CHR-70 Generation 3 which I purchased from Madisound for $36 each. They are nominally 8 ohms, fs 65 hz, qts .55, xmax 4 mm and 85db.
The 1/2 inch plywood is way too thin and should be at least 3/4 inch. The holes surrounding the speaker are used to mount the polycarbonate to which the cones are attached.
Before we go much further, I had certain problems designing the speaker that are non sound related. First, I don't have a van to cart the finished product around. To get it to the competition in my car, I need to be able to disassemble the monster and fit four huge cones into the car. I have two in the back seat, one in the front passenger seat and one in the boot (trunk).
Next the speakers are way too large to sit comfortably in my listening space. Some people might think that they are God awful ugly as well. These were not going to be keepers by any means. In fact, they are disassembled already and hidden away so that guests will not be horrified when they come to our house. I was fortunate that my wife put up with them for a week or more.
Finally, I am not very good at woodwork.

Our house had a leak in the roof and I repaired it by replacing a few shingles. In the process I bought a roll of felt roof stuff for a bit under $20 from Home Depot. It's 36 inches wide and as far as I can make out, you get about 72 feet of the stuff. I had oodles left over from the roof repair so I decided to try this stuff.
Tractix and exponential horns would be out of the question for me to build so I went with simple conical. After some messing around with some small trial models, I finished up with this pattern. The pie piece taken out is approximately 135 degrees. I cut a small hole in the center so that I can turn it into a cone. I kept this piece as a template and cut out extra cones as I needed them. It helps to have a white pencil to stand out against the black of the felt.

Two more of the ingredients. In the middle is the double sided tape that costs about $5.00. If I were to do this again, it would be cheaper to buy the 37 foot roll for $16 to allow for mistakes. The smaller roll shown here only has 5 foot of tape.
The other component is a piece of polycarbonate (8" x 10" for $4) to which I attach the cone. First I cut a 3 7/8" hole in roughly the middle and drill some smaller holes to mount the polycarbonate (and cone) to the plywood. More about this later.

The double sided tape ready for the cone to be created. It wasn't all that difficult to form the cone and form the overlap. At this stage, the cone is definitely floppy.

The cone is now ready for the treatment. First, I placed it on some scrap pieces of felt to protect the deck. The polycarbonate is weighted down by one of those handy pencil holders that you can buy at Ikea. A bit of weight is needed to make sure the cone retains its shape.

A small level makes sure that the polycarbonate is horizontal.

The final ingredient. Great Stuff expanding foam. In this case I tried Gaps and Cracks for a bit under $4. I had used theWindows and Doors ($6) and noticed that it excellent glueing properties as well as creating a somewhat rigid foam. Having tried both, I think you can probably get as good results with the cheaper version.
Be warned. Read the label before using and wear gloves and eye protection when you use this stuff. If it gets on you then it is very very difficult to get off.

So here is my first attempt. I sprayed first under the polycarbonate to make sure I had plenty of the stuff attaching the polycarbonate to the cone. Then I just kept going around and around until the can ran out. I tried to make sure I got a good amount at the large mouth of the cone. It only takes a few minutes. Unfortunately you need to do all very quickly. If you stop for a few minutes half way the foam stuff clogs in the application tube. I'm sure if you used this foam stuff every day you would get good at getting a steady stream of foam coming out of the application tube. Obviously I don't do this every day and it's all somewhat haphazard. You can tell when you getting close to the end of the can since the volume of foam drops off.
When done, make sure the polycarbonate is still level and then walk away from it for several hours to let it cure. The foam starts to form a surface very quickly but takes about 8 hours to cure completely.


I made sure the cones would fit in the car.
This was my test run with the cheaper foam. The cone was reasonably sturdy and did not flex too much so I created two more cones with the Window and Door foam but after applying the foam I placed about 100 small craft sticks from Dollar Tree into the foam in various patterns to provide more rigidity. For some reason or other, I don't seem to have a close up photo of the process but if you look closely in the first picture at the top of the page, you can see the sticks.

I decided to try a sandwich effect with an inner and outer cone with foam in between. I cut out some small blocks of faom about 1/2 inch thick and attached them to the outside of the inner cone with the double sided tape.

Then I drilled some 1/4 inch holes about half way up the outer cone. The foam applicater tube is not all that long so the holes would allow me to insert foam into the middle area of the cone.

I then squirted in the foam first at the throat end and then at the mouth. Then into the holes half way up. As you can see, it was a sloppy process and foam leaked all over the place. I then let if overnight to dry.

Inside the sandwich at the mouth. I would have to say this was not entirely successful and I could feel where there were voids in various areas of the sandwich. However, the sandwich cone was stiffer than the single cone version.

The following day, I attached the polycarbonate to the cone with an extra can of foam. When it dried, I just cut out the foam in the 3 7/8" hole in the polycarbonate. With sufficient force you can separate the polycarbonate from the foam but it does take some force. There is no danger of the cone falling off the polycarbonate.
Next I attached the polycarbonate to the plywood with bolts and nuts and connected the speakers. After the recommended 30 hour breakin for the drivers I've been pleasantly surprised by amount of bass coming out of these 4" speakers. I don't have any sophisticated measuring equipment so just used a signal tone generator to see how low it would go. It got down to 30 hz or so but of course the level was way down. Still I was impressed.
The speakers are way too big for my listening area and they sound much better the further I get away from them compared with my usual relatively closeup listening position. I suspect they might sound half way decent in Steve's room at the actual competition.
For a few hours I tried the H frame horns in one channel and just the speaker in the plywood in the other channel. There is definite an increase in sound level in the horn version.
One of the speakers uses two of the single cones and the other speaker uses two of the double (sandwich) cones. To be honest I can't tell the difference between them.

My wife is a quilter and she uses all of the wall surfaces in our house to display her quilts. She had taken down the usual resident of this blank space so that she could mount a Christmas quilt. Seeing that I had an opportunity, I hung up my original full scale test version. She didn't notice it for about 30 minutes but let's just say that the Christmas quilt is now installed in the place of honour.
In the foreground is the left over roll of felt. I could get a dozen or more horns out of what's left of that roll. It was a lot of fun working out how to do this and I probably will get additional ideas later on how to stiffen the horns.
You might have gathered that the cones will be going to the dump after the competition and you would be correct. If I were to keep them, I would keep the single cones and apply more sticks and foam to cover the entire cone. The sandwich idea was ok but too uneven.
I asked my daughter to review this page to see if it made sense to her. She suggested adding chicken wire to the outside of the cone / foam to see if that improved stiffness. That led me to think about other inexpensive lightweight stiffening methods. Last night I thought of the grate stuff that lies below fluorescent lights. Cut it up into small sections and distribute around the outside into the foam.
I've also started to think about painting the inside of the cone with something like polyurethane to provide a less sound absorbent surface than the felt. I might also try some Minwax wood hardener.
I've since tried the Minwax wood hardener and it is marginally effective, but not too much improvement.
We held the competition which you can read about here. As I suspected, the speakers sounded better sitting further away in a larger room. Opinions were mixed about these speakers. The roll off in the treble was noticeable compared to the other speakers, but in some ways I liked it. I felt these speakers did better than the other entries in the more complex orchestral music. Somebody mentioned that these speakers sounded as if the old 'loudness' button was on. If I were keeping the speakers, I would try adding a tweeter facing upwards between the horns.
So the speakers were disassembled and the cones put in a dumpster. My wife is very patient with my hobby, but even I know when enough is enough.